
Social media platforms are one of the most trusted ways to grow an ecommerce brand. They allow you to reach your audience at scale while conveying the unique value that your business has to offer. With its appealing visuals and powerful marketing features Instagram is a top social platform for businesses across niches. In this post, we’ll walk through how to connect WooCommerce to Instagram to unlock all the features the platform has to offer.
Why use Instagram to market your WooCommerce business?
Powerful visuals
Social media platforms are inherently visual. But Instagram takes it to another level. Many of today’s buyers use visual content to inform their buying decisions. Visuals give in-depth details of the items people want to buy.
You can use the visual nature of the platform to promote lifestyle photos showing your products in action with real people.
Product discovery
Instagram provides great potential for reaching your ideal customer. The platform has over one billion monthly users, over half of whom log in every day. With so many people, it should come as no surprise that over 20+ million businesses use Instagram to reach their target audience.
Nearly 80% of all Instagram accounts follow at least one business profile.
This means your target audience has come to expect (and want) regular content from their favorite brands. Plus, the platform’s highly visual content provides a unique experience to customers as they can engage with their favorite brands without being overwhelmed with sales messaging.
Detailed audience targeting
If you’re familiar with Facebook advertising, you are aware of the many targeting features available to businesses. You can refine your ad targeting using a wide range of demographics including age, gender, location, and income level. You can also create lookalike audiences to reach shoppers that share similar traits with your previous buyers
With behavioral targeting, you can showcase your products based on the previous actions people have taken on your site. For example, if a visitor viewed multiple products in a specific category, you create an Instagram ad campaign that shows that person those types of products.
User-generated content
Instagram users love interacting with brands by sharing their own content including their favorite products. This user-generated content is highly effective in growing your audience. People tend to trust their peers more than businesses.
By getting others to showcase, their positive experiences with your business, you can win customers that would otherwise be uninterested.
User-generated content is easy to scale. You can establish a brand hashtag that people can use when posting images with your products. As it grows, you can gather the various posts and add them to your profile as well as your ecommerce site.
Connecting Instagram with WooCommerce
Set up Facebook and Instagram Business pages
There are a few things you need to have in place before integrating Instagram with WooCommerce. To start, you will need to create a Facebook page for your business, if you don’t already have one.
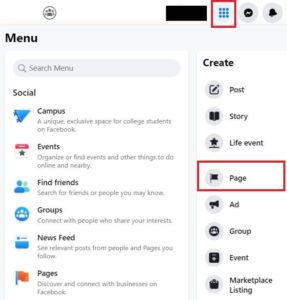
To create a business page from your Facebook account, open the menu and find Create > Page.
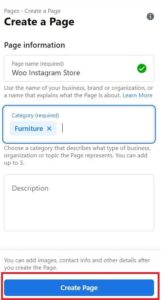
Enter a name for the page, pick a category, and select Create Page. The app will take a few seconds to generate the page, after which time, you can begin adding details and eventually content.
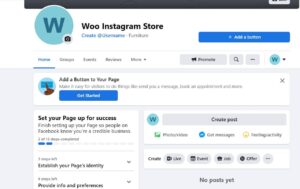
From the Facebook homepage, go to Pages in the left-hand menu. This will take you to a list of your pages. Click the recent creation.

On the new page, you can begin adding details such as a username, location, website, email address, and other business information.
Connect your Instagram account to Facebook
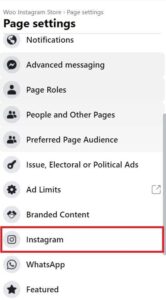
Your Instagram account needs to be connected to your new Facebook page. From the page, go to Settings, scroll until you see Instagram in the left-hand menu.
Click the Instagram icon followed by Connect account on the next page.

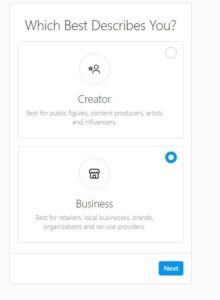
Facebook will ask you to allow access to Instagram messages in your inbox. Click Continue and sign in to your Instagram account (if not already logged in). You will then need to choose between a Creator or a Business account. Select Business, as it is necessary to use features like Instagram Shopping.
Next, you will need to accept additional permissions. You will also have the option to add your contact information. Finishing these steps will complete the Business account setup.

Click Done to finalize the connection to your business page. Back in the Instagram settings you should see the username for the account.

Set up shopping for your Facebook page
Products that you want to promote through Instagram Shopping need to be part of a Facebook catalog and connected to the page. To add the products to you page, you will need to setup the page for Facebook Shopping and establish a Facebook Commerce account.
You can enable shopping for the page by changing its default template. Go to your Business Suite, select the page from the dropdown menu in the upper left corner and click All tools.

Go to Page settings > Templates and Tabs.

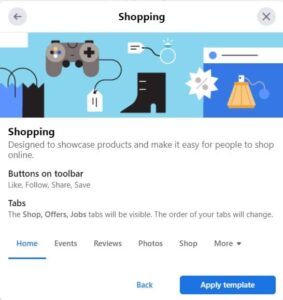
If you just created the page it will be set to the Standard template. Click Edit and select the Shopping template.
Finally, select Apply template. This will add a shop tab to the page that customers can use to view your items. It will also give you the ability to add products to the shop without having to navigate to the Business Suite backend.
Connect Facebook to WooCommerce
By now, you can tell that Facebook and its advertising platform is the central hub from which you will manage your Instagram catalog. To streamline the process, it is best to set up a direct integration between WooCommerce and Facebook. We have a separate post detailing how to integrate the platforms.
In short, you will need to:
- Download Facebook for WooCommerce extension
- Connect your Business Manager (now called Meta Business Suite) account
- Connect your Commerce Account
- Configure your settings
This is where you will also create your initial product catalog. The Facebook catalog automatically syncs with your WooCommerce offerings. You can then assign this catalog to your business page. This will make it available to Instagram as well.
WooCommerce Instagram extension
The Facebook integration will let you manage your product catalog and buy paid ads directly from WooCommerce. However, it does not enable some of the other features afforded to Instgram businesses including shoppable posts, hashtags, and displaying your profile post on your storefront.
For this, you will need to establish a direct integration with Instagram. There are several plugins that will do the trick. In our example, we will use the WooCommerce Instagram extension. It is quick to set up and will allow you to implement all the features mentioned above.
Connect Instagram account
After you download the extension, the first step to configuring the integration is to connect your Facebook page and Instagram Business account.
Go to WooCommerce > Settings > Integrations and select Login with Facebook.

Facebook will ask which account you want to use. Assuming you are still signed in to the account used to create the page, you can proceed with the default selection.
You will then see a list of the Instagram Business Accounts connected to the Facebook account. Select the account that you will use to manage the store. This will prompt a list of pages managed by the Business account. Select the business page you created earlier.
The plugin will then ask you to accept permissions to access your Facebook assets. After you accept them, you will be directed back to your WooCommerce store. The final step is to select the page from the dropdown menu and to save your settings.

Adding images from Instagram to WooCommerce pages
With the extension, you can add a curated feed of images from your Instagram to WooCommerce pages. There are several settings to change how the Instagram images are displayed on your product pages.
This includes:
- Number of images
- Number of columns
- Images to display
The images to display setting lets you implement two types of images; the most recent images and the best-performing images, specifically the ones with the most likes and comments.
If you are fetching the most recent images, Instagram only returns those published in the past 24 hours. The plugin will store images from the previous day to ensure that your feed doesn’t display an empty list.
There is also an option to display both recent and top images. With this setting, the plugin will use the same methods to ensure that your feed is not empty.
Change location of images
You can change where your Instagram images appear on your product pages by using the following snippets to your functions.php file:
// Remove current location.
remove_action( 'woocommerce_after_single_product', 'wc_instagram_product_hashtag' );// Set the new location to any available hook of the 'content-single-product.php' template.
add_action( '{wc-single-product-hook}', 'wc_instagram_product_hashtag' );
Adding hashtags to products
To add an Instagram hashtag to a product go to WooCommerce > Products and select the item that you want to tag.
Scroll to the Product Data tab and select the Instagram section. Add your hashtag and save the product.
If you have applied these tags to display across your site, the product will then appear there.
Keep in mind that the plugin won’t filter images that are displayed.
This means posts from any account can appear on your site, so long as they use the hashtag. As such, it is recommended that you choose a hashtag unique to your business. This will ensure that your site is not populated with irrelevant images.
How to create shoppable posts
Instagram Shopping is a feature that lets you tag your products directly within Instagram photos and Stories. You can choose the exact area of the photo that shows the product, list its price, and then have the link take visitors to your WooCommerce page.
The feature also lets you tag multiple items in a single photo.
By allowing users to view your product catalog on your Instagram page, you give them the ability to discover products faster without having to be redirected back to your website.
Set up product catalog
Instagram Shopping requires a connected Facebook catalog. There are two options to streamline the process of syncing a catalog with WooCommerce.
- Use the Facebook integration which will automatically update the feed via API
- Use the WooCommerce Instagram extension to create an XML which can be manually uploaded and then fetched based on a schedule
We recommend the first approach, which is why it is included at the start of the guide. The XML fetches afforded by the WooCommerce Instagram extension can be scheduled so that you don’t need to do so manually again and again.
However, the first approach has more options for refining your selection and can be used to create directly in WooCommerce.
Set up Instagram Shopping
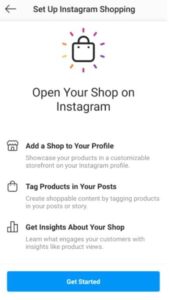
To create shoppable posts, you will need to set up Instagram Shopping. This will also add a Shop to your profile similar to Facebook.
Go to your Instagram Profile Settings and select Business > Shopping > Set Up Instagram Shopping.
You will then connect your Facebook account and page connected to your Instagram account.

Next, you will select the product catalog with your WooCommerce items. After that, you will need to select a website domain for the catalog. This step validates that you own the store connected with the catalog.
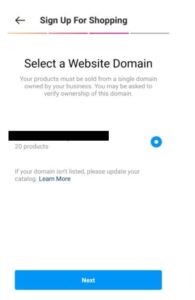
If you haven’t verified the domain with Facebook yet, go to your Business Manager account followed by Business Settings > Brand Safety > Domains to complete the process.
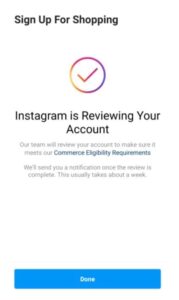
After you select the domain, you can submit your catalog for review. This typically takes a few days.
Once you are approved for Instagram Shopping, the final step to begin tagging products is to go to Settings > Business > Shopping and then select the catalog that you want to use and click Done.
You can then add shopping tags to existing posts or create new posts to tag your products. When adding a tag, tap the area of the photo you want the tag to appear and start typing the name of the product until it appears in the search box.
Conclusion
This post outlined the essential components of integrating WooCommerce with Instagram. When you connect the two, you gain access to the millions of users that use the platform every month, allowing you to unlock the many benefits the social media platform has to offer.