
Magento and WooCommerce have many similarities. Both open-source platforms give the unparalleled ability to customize an ecommerce store. However, over time, you may seek to transition from Magento to a solution that is easier to use.
If you are considering a Magento migration, it can seem like a cumbersome task. But, it doesn’t have to be — if you know what you are doing. This post outlines what you need to know when migrating from Magento to WooCommerce.
Comparing WooCommerce & Magento
Ease of use
Having a platform that is easy to use is key to creating and managing your ecommerce store. This becomes even more critical when you handle the bulk of the work building your site on your own.
WooCommerce and Magento have many of the same core features but offer rather different user experiences.
Magento is designed for experienced developers with plenty of technical knowledge. Because of this, the platform is often more challenging for regular users. You’ll need a fair amount of web development skills to get the most out of the platform. Or, you’ll need to employ or outsource developers.
WooCommerce is designed for beginners and other less technical users, making it an overall easier-to-use platform. You can design and launch your store without any coding knowledge, but still have the option to dive into the code as needed to customize your store.
Scalability & extensibility
As your store grows, you need a platform that scales with you. It must handle high traffic volumes and unexpected traffic spikes all while being able to handle a large product catalog. Both platforms are highly scalable with support for unlimited products.
You can easily process thousands of orders without any issue.
Both WooCommerce and Magento also work well with your other tools. Payment gateways, email marketing tools, and social media platforms are just some of the integrations you can quickly set up for either platform.
There are also plenty of plugins and extensions for adding new features to your site. Keep in mind, that with Magneto, the extensions are more complex, and setting them up properly tends to require more technical skills. WooCommerce extensions tend to be easy to implement and are effective for taking a site to the next level.
SEO
Search engine optimization (SEO) can provide your store with a valuable source of traffic. WooCommerce and Magento both come with strong SEO features for optimizing your site for search crawlers.
As two open-source platforms, you can use the flexibility to fine-tune any SEO factor as needed.
However, there are some differences when it comes to creating content. Being built on WordPress, WooCommerce gives you all the important features and functionality to publish content. Magento doesn’t have built-in blogging functionality. If you want to implement a content strategy, it requires you to set up an extension.
Migrating from Magento to WooCommerce
1. Set up web hosting and the WordPress CMS
Before you can start creating your new WooCommerce shop, you need to make sure your hosting environment is ready for the switch. Because Magento is another self-hosted platform, you will likely already have web hosting that will work for your new shop, provided you have access to your hosting panel and can install WordPress on your site.
However, if you’re looking for better control and flexibility, you can benefit from choosing a hosting plan designed specifically for WordPress. Doing so provides the best uptime, page load speeds, and security. You also get top-notch support from experienced WordPress and WooCommerce users.
The GoDaddy Managed WordPress Ecommerce Hosting service comes pre-installed with both WordPress and WooCommerce. Plus, the plan includes 45+ high-quality WooCommerce extensions free of charge.
These extensions are useful for extending your store’s functionality and adding new features.
Once you have WordPress on your site, you can download WooCommerce to begin the set up process. The plugin is available from the WordPress Admin panel by going to Plugins > Add New and searching “WooCommerce.
Download the plugin and click activate once complete. This will take you through an initial configuration process, where you can choose a theme and define your basic settings.
If you opt for a dedicated WooCommerce hosting plan like the GoDaddy Managed Ecommerce Hosting, WooCommerce will be installed for you.
2. Export data from Magento
After you get WooCommerce up and running, you can begin exporting your data from Magento. Below are the steps needed to export different types of data from your current ecommerce store.
Exporting products
Start by exporting your products as this is the most vital information needed to get your new store up and running. From your Magento Admin menu go to System > Data Transfer > Export.
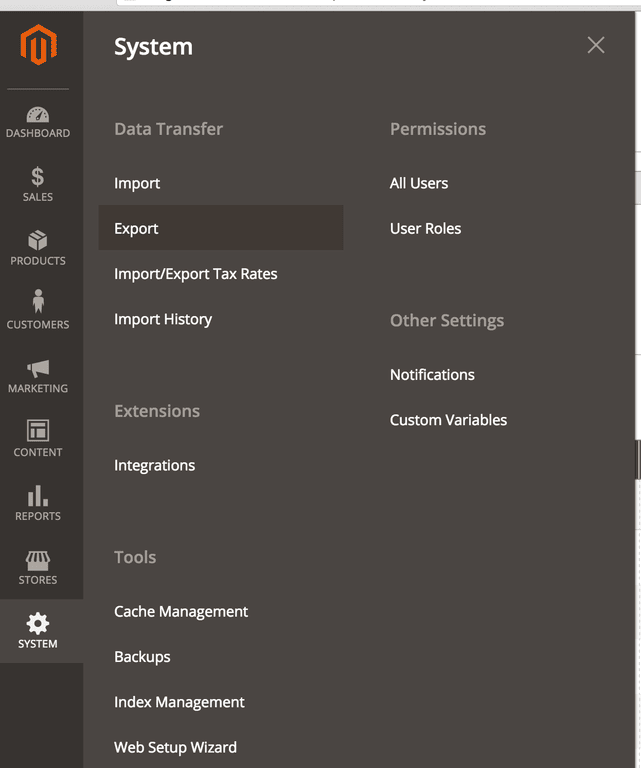
Select Products as the entity type and set the Export File Format to CSV. This will prompt a list of attributes to appear below. You can then apply filters for different attributes as needed to remove any products that you don’t want to include in the export file.
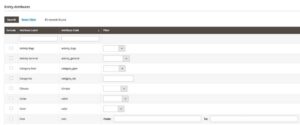
You also have the option to choose the fields that you want to include or exclude from the file by checking the box next to each field. Click Continue to generate the file. Here is a list of the key columns included in the CSV:
- SKU
- store_view_code
- Attribute_set_code
- Categories
- Name
- description
- short_description
- Weight
- Tax_class_name
- Price
- Special_price
- Meta_title
- Meta_keywords
- Meta_description
Exporting customer data
Next up, you will want to export your customer data. Return to System > Data Transfer > Export and select Customers Main File as the Entity Type.
Use the attributes to filter out any customers that you want to exclude from the export and remove any fields that are unnecessary. Click Continue to generate the CSV file.

3. Import data into WooCommerce
Now that you have exported your important data, you can begin populating your WooCommerce store. It is best to start by adding your products first. This is because they’ll then be connected to any subsequent uploads of customers and orders.
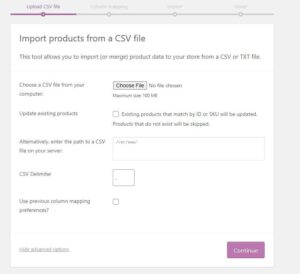
With WooCommerce, you get a built-in CSV importer to simplify the process of importing products. To use the importer go to WooCommerce > Products and select Import.
![]()
![]()
Upload your Magento export file. If you have existing products in WooCommerce, you’ll need to decide if you want to update any current products that share a SKU with any product in the export file. Click advanced options and add your CSV Delimiter if you have one.
Click Continue to begin mapping your columns. WooCommerce automatically matches the column name from the file to the appropriate WooCommerce product fields. If it is unable to automatically map the fields, you can manually assign matching columns by opening the dropdown menu next to each row.
When ready, click Run the Importer to finish the upload process. That’s it. Your Magento products should now be in WooCommerce. Make sure to check a few products to confirm that everything was populated correctly.
Import customers and orders
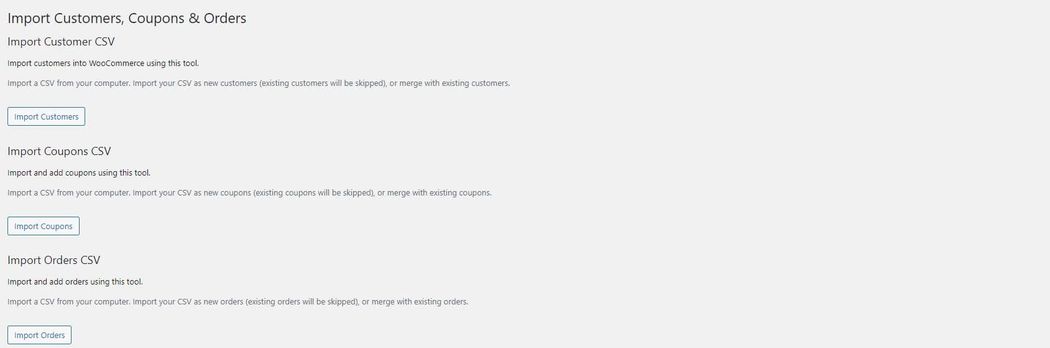
Next, you’ll want to import your orders, coupons, and customer data. For this, we recommend using the Customer/Order/Coupon CSV Import Suite extension (included in our GoDaddy Managed WordPress Ecommerce Hosting).
The extension can handle multiple file types and you also have the option to copy and paste your data directly. The latter is only a viable method if you have a small amount of information but it can help you move data quickly.
Like the native CSV importer, the extension allows you to map columns to the appropriate WooCommerce fields. If you decide to import orders, it’s important to import any customer data like contact information and accounts first. This way, orders can then be mapped to your customers.
After you install the extension, you can begin importing your products by going to WooCommerce > CSV Import Suite. From there, you’ll find sample CSV documents for all three data types. You can review these samples and compare them to your import file to ensure that you’ve formatted the import file properly.
Let’s look at how to approach importing your customers into WooCommerce.
Importing customer data
Click Import customers. Choose the import method and click Next. For our example we will use CSV or tab-delimited text file.

Upload your file and click Next. You’ll then need to configure a few settings. Among these are the options to merge existing records and automatically send welcome emails to customers after import. After you configure your settings, you can review a preview of the table to quickly check for any errors.
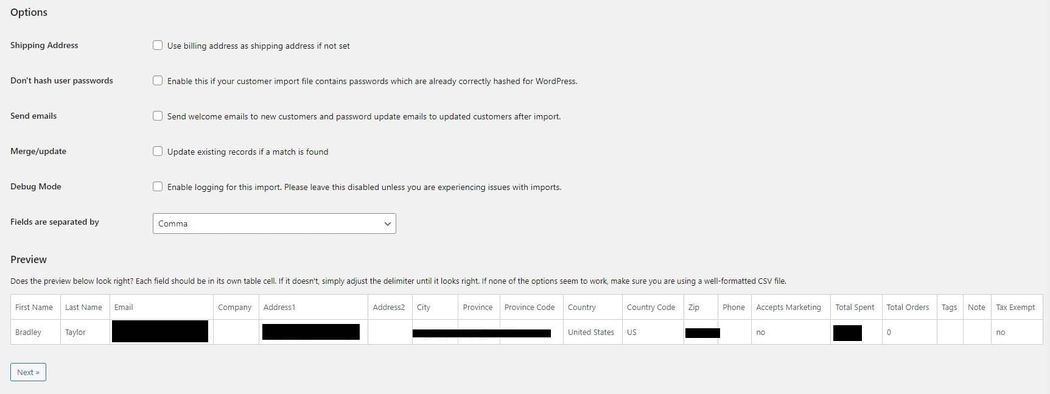
The next step is to map your imported columns to your WooCommerce data fields. There are some general formatting rules you must follow. Each customer needs its own row. The first row should include column headers so the extension knows where to map the fields.
Start with Email as it is required for a customer profile in WooCommerce. WordPress will automatically assign the User ID as customers are created. The other fields are optional and you can skip them if you wish. But ideally, you’ll transfer as much data as possible.
Below are some of the recommended minimum customer columns:
- User_id
- Shipping_first_name
- shipping_last_name
- Shipping_address_1
- Shipping_address_2
- Shipping_city
- Shipping_state
- shipping_postcode
- Shipping_country
- Billing_first_name
- Billing_last_name
- Billing_address_1
- Billing_address_2
- Billing_city
- Billing_state
- Billing_postcode
- billing_country
- Billing_phone
- Username
- Password
Once you configure your field mapping, click Dry Run to run a test and see how the extension processes the data.

This will show how many new customer accounts are inserted, how many are merged with existing profiles, and how many fail.
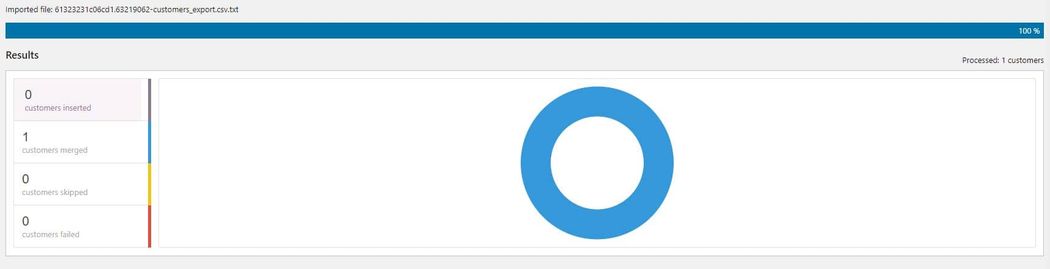
Once you confirm that everything is set up properly, you can go ahead and run the live import. Click run a live import now to start the process.

After the process finishes, you should be able to see all your customer data by going to WooCommerce > Customers.
Importing coupons
You can use the same process when importing your coupons. The only requirements columns are the coupon_code, discount_type, and amount columns.
Importing orders
Finally, you want to import your past orders to WooCommerce. Because orders need customer and potentially coupon data, saving orders for last is recommended. Order items are mapped to products via SKU or product_id.
Payment gateway migration
At the end of the day, the point of your ecommerce store is to make money. To do so, you need a way to capture payments. Magento and WooCommerce both support all major payment gateways. If you want to keep your same gateway, you’ll have the ability to transition ecommerce platforms without having to go through extensive data transfer.
Migrating pages and themes
Once you have successfully migrated your data over to WooCommerce, you’ll then need to design the frontend experience for your store. You will also need to configure the native settings and set up extensions to add the desired functionality to your store.
This is the most difficult part of the process. Recreating design elements and pages is more complex than moving basic data. You can copy the HTML code from your Magento pages and manually add them to your new pages in WooCommerce.
Alternative ways to migrate from Magento to WooCommerce
If you do not want to manually import and export files, there are more automated approaches that you can use. For example, you can leverage the WordPress REST API to migrate your data. Or, you can use an online migration platform or service to transfer the information. Below are some popular ecommerce migration services:
With one of these services, you’ll also be able to transfer categories, blog posts, and web pages in addition to your products and order data.
Conclusion
Migrating from Magento to WooCommerce gives you a more user friendly platform for managing your store. When you’re ready to make the transition, we have a variety of hosting options to suit your business needs. The Managed WordPress Ecommerce Hosting plan gives you the tools to get your new store up and running quickly.