
A seamless delivery process leads to satisfied customers. You must not only ensure that buyers get their orders, but that they are kept in the loop while waiting for their delivery. This is why order tracking in WooCommerce has become critical to ecommerce businesses using the platform.
Without it, the uncertainty can lead to anxiety and eventually inquiries to your support team.
These complaints are unnecessary and not helpful for your business. Plus, they take up your time and ultimately lead to less trust in your brand. In this post, we will look at how to set up shipment tracking in WooCommerce to give your customers a great delivery experience.
Why is it important to implement tracking details into your ecommerce store?
Tracking numbers are the means by which buyers can stay on top of the delivery status of their orders. These unique sets of numbers are created by shipping carriers and assigned to each delivery.
Understandably, it has become best practice to include a tracking number with every purchase.
Customers want a quick and convenient way to check up on their purchases. This could be a confirmation email, order status page, or another form of communication. Here are some of the benefits to gain by implementing accurate order tracking for your store:
Improved customer experience
Shipment tracking is a critical part of the customer experience. It gives buyers peace of mind after placing their order, as they know where their goods are at each step of the fulfillment process. By providing customers the ability to track their orders, you greatly improve the buying experience, which will ultimately lead to improved loyalty and retention.
Help for your support team
Whether you handle customer support yourself or use a dedicated team, handling inquiries takes considerable time and effort. When you neglect to provide tracking information, it often leads to an influx of questions and concerns from your buyers.
You can save your business from having to answer unnecessary questions or complaints by setting up a system to include tracking with every order. By doing so, you free up your staff to deal with more important issues.
Transparency builds trust
Order tracking adds transparency to the fulfillment process. You want to be as transparent as possible as it leads to increased trust in your business. This trust is reflected in customer reviews, making it easier for your business to win new prospects when they are introduced to your business for the first time.
Simple order tracking with WooCommerce Shipment Tracking
The WooCommerce Shipment Tracking extension makes it easy for your customers to track the delivery status of their orders. With it, you can quickly add tracking details directly to each WooCommerce order. These details then appear in transactional emails as well as the View Order page in the customer’s account.
In addition to supporting custom tracking links, the plugin supports automated links for the following major carriers:
- Australia Post
- Canada Post
- DHL
- FedEx
- OnTrac
- Royal Mail
- UPS
- USPS
The Shipment Tracking extension is included in the GoDaddy Managed WordPress Ecommerce Hosting plan. Stores built using other hosting providers need to purchase and download the extension from the WooCommerce website.
Adding tracking to individual orders
With the Shipment Tracking extension active on your site, you will see a new panel for shipping information on your edit order screens.
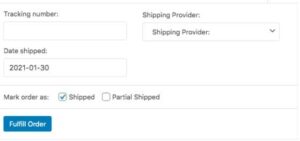
To add the tracking details, scroll to the Shipment Tracking section and select Add shipment tracking.

This will open a new window where you can enter the information. Paste the tracking number into the corresponding field. If the package is being shipped by one of the supported carriers, the plugin will automatically detect the carrier based on the first few characters of the tracking number. It will then automatically add the tracking URL.

If you are using a provider that is not supported by the plugin, you will need to add the custom tracking URL along with the tracking number. Select Other as the carrier and enter the carrier’s name.
Order meta data
The Shipping Tracking extension stores tracking information in the order meta using the _wc_shipment_tracking_items meta key. The array consists of the following:
- tracking_provider
- custom_tracking_provider
- custom_tracking_link
- tracking_number
- date_shipped
With the wc_st_add_tracking_number helper function, you can add tracking info directly to an order. Here is an example of the code:
if ( function_exists( 'wc_st_add_tracking_number' ) ) {
wc_st_add_tracking_number( $order_id, $tracking_number, $provider, $date_shipped, $custom_url );
}
Change the default shipment provider
By default, the shipping carrier is set to Custom. If you want to change the default shipping carrier, you can use the following hook: woocommerce_shipment_tracking_default_provider. To use it, you need to add the function to your functions.php file. Here is how to change the default provider to USPS.
add_filter( 'woocommerce_shipment_tracking_default_provider', 'custom_woocommerce_shipment_tracking_default_provider' );

function custom_woocommerce_shipment_tracking_default_provider( $provider ) {
$provider="USPS";
return $provider;
}
REST API
The Shipment Tracking extension supports the WooCommerce REST API. You can use it to create, view, and delete the tracking details for individual orders.
Here is an example of how you can use the API to create a new shipment tracking:
POST /wp-json/wc-shipment-tracking/v3/orders/645/shipment-trackings
If you use the name of a predefined provider, you do not need to pass tracking_link.
curl -X POST https://example.com/wp-json/wc-shipment-tracking/v3/orders/645/shipment-trackings
-u consumer_key:consumer_secret
-H "Content-Type: application/json"
-d '{
"tracking_provider": "TNT Express (consignment)",
"tracking_number": "12345678",
}'
And here is an example of the JSON response:
{
"tracking_id": "7f4978c390ee633c6294ae0f258656f9",
"tracking_provider": "TNT Express (consignment)",
"tracking_link": "http://www.tnt.com/webtracker/tracking.do?requestType=GEN&searchType=CON&respLang=en&nrespCountry=GENERIC&sourceID=1&sourceCountry=ww&cons=12345678&navigation=1&gnenericSiteIdent=",
"tracking_number": "12345678",
"date_shipped": "2016-08-11",
"_links": {
"self": [
{
"href": "https://example.com/wp-json/wc-shipment-tracking/v3/orders/4497/shipment-trackings/7f4978c390ee633c6294ae0f258656f9"
}
],
"collection": [
{
"href": "https://example.com/wp-json/wc-shipment-tracking/v3/orders/4497/shipment-trackings"
}
],
"up": [
{
"href": "https://example.com/wp-json/wc-shipment-tracking/v3/orders/4497"
}
]
}
}
Below is an example of how to use the API to retrieve a shipment tracking.
curl -X GET https://example.com/wp-json/wc-shipment-tracking/v3/orders/231/shipment-trackings/7f4348c390ee631c6394ae0f258656f2
-u consumer_key:consumer_secret
And, the JSON response:
{
"tracking_id": "7f4348c390ee631c6394ae0f258656f2",
"tracking_provider": "TNT Express (consignment)",
"tracking_link": "http://www.tnt.com/webtracker/tracking.do?requestType=GEN&searchType=CON&respLang=en&nrespCountry=GENERIC&sourceID=1&sourceCountry=ww&cons=12345678&navigation=1&gnenericSiteIdent=",
"tracking_number": "12345678",
"date_shipped": "2022-02-11",
"_links": {
"self": [
{
"href": "https://example.com/wp-json/wc-shipment-tracking/v3/orders/45293/shipment-trackings/7f4348c390ee631c6394ae0f258656f2"
}
],
"collection": [
{
"href": "https://example.com/wp-json/wc-shipment-tracking/v3/orders/5362/shipment-trackings"
}
],
"up": [
{
"href": "https://example.com/wp-json/wc-shipment-tracking/v3/orders/5362"
}
]
}
}
Finally, here is a sample of how to delete a shipment tracking:
DELETE /wp-json/wc-shipment-tracking/v3/orders/<order_id>/shipment-trackings/<tracking-id>
curl -X DELETE https://example.com/wp-json/wc-shipment-tracking/v3/orders/231/shipment-trackings/c8ce8278b1e6ddc93b1b465992bac886
-u consumer_key:consumer_secret
And the JSON response:
"tracking_id": "c6ce8274b1e6edc93b1b265992bac876",
"tracking_provider": "TNT Express (consignment)",
"tracking_link": "http://www.tnt.com/webtracker/tracking.do?requestType=GEN&searchType=CON&respLang=en&nrespCountry=GENERIC&sourceID=1&sourceCountry=ww&cons=12345678&navigation=1&gnenericSiteIdent=",
"tracking_number": "12345678",
"date_shipped": "2022-02-11",
"_links": {
"self": [
{
"href": "https://example.com/wp-json/wc-shipment-tracking/v3/orders/5293/shipment-trackings/c6ce8274b1e6edc93b1b265992bac876"
}
],
"collection": [
{
"href": "https://example.com/wp-json/wc-shipment-tracking/v3/orders/5293/shipment-trackings"
}
],
"up": [
{
"href": "https://example.com/wp-json/wc-shipment-tracking/v3/orders/5293"
}
]
}
}
Advanced Shipment Tracking for WooCommerce
Advanced Shipment Tracking for WooComerce is another WordPress plugin for managing your shipping and tracking information. It supports over 250 shipping carriers around the globe to automatically create tracking links to send to customers.
With the plugin, you have full control to customize the display of tracking information in your transactional emails. There is a customizer with live preview functionality enabling you to quickly test your designs before passing them on to your customers.
Adding tracking detail to orders
Like the prior extension, Advanced Shipment Tracking adds a new information panel to your edit order pages. You can use this to populate the tracking information for individual orders.
The plugin also lets you add tracking details from your Orders list page. This can speed up the process as you can move from order to order without having to navigate to different pages. Click the Bulk actions dropdown and select add tracking. This will open a lightbox to input the information for the order you have selected.
After you add the tracking details, they will appear in the far right column of the Orders list.
REST API support
The extension works with the WooCommerce REST API to add endpoints for creating and managing your shipment tracking information. It supports the traditional API methods including, GET, POST, and DELETE. Below is the endpoint URL:
https://yoursite.com/wp-json/wc-ast/v3/orders/<order_id>/shipment-trackings
Shipping to multiple addresses
Tracking details are not the only part of the delivery experience where convenience is important to customers. It is also essential that you give shoppers flexible options concerning where they can have their orders delivered.
Most people will have all of the items in their order sent to the same address. But for others, there is a need to split the order items between multiple delivery locations. For instance, during the holidays when someone may shop for gifts for several people.
With the Shipping Multiple Addresses extension, you can give customers the option to choose various shipping addresses when completing their orders.
After you activate the extension, it will automatically create a child page called Shipping Addresses under your checkout page. Customers can use this page to set up their various shipping addresses.
If you want to change this page, go to WooCommerce > Settings > Shipping > Shipping Options. Find the field for Multiple Shipping Addresses and click the dropdown menu.
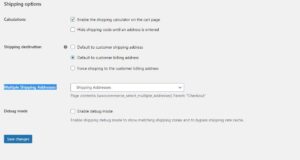
From there you can select a new page for customer shipping addresses. To use the content from the default page on your custom page, use the following shortcode:
[woocommerce_select_multiple_addresses]
The extension helps speed up the checkout process for repeat buyers by allowing them to save their various addresses to their accounts. They can find them on the Shipping Addresses page as well as going to My Account > Addresses.
The new address form created by the extension includes Import billing address and Import shipping address buttons that let you automatically load your default information so that you can quickly make any modifications to save the new address.
Tracking details for multiple addresses
With the Advanced Shipment extension, you can add multiple tracking numbers from the edit order page. Once you save the initial tracking number, the info panel will adjust to show the first number as well as an Add tracking info button to add more details.
Cart page display
On the cart page there is a new button added for the Duplicate Cart feature. When selected, it will duplicate the products in the cart and take you to the Shipping Addresses page created by the plugin.
This is useful if you wanted to send the same cart to multiple addressees. For example, you might be getting all family members the same gift for the holidays. You can adjust the quantity and address for each line item.
Add extra fields to addresses
If you want to add extra fields to the address forms, you can do so using actions and filters. Below is some example code illustrating such effect:
function custom_shipping_fields( $fields, $country ) {
$fields['shipping_test'] = array(
'label' => 'Test',
'placeholder' => 'Test'
);
return $fields;
}
add_filter( 'woocommerce_shipping_fields', 'custom_shipping_fields', 10, 2 );function display_custom_shipping_fields( $formatted_address, $address ) {
if ( isset( $address['shipping_test'] ) ) {
$formatted_address .= '<br/>Test: '. $address['shipping_test'];
}
return $formatted_address;
}
add_filter( 'wc_ms_formatted_address', 'display_custom_shipping_fields', 10, 2 );
Final thoughts on order tracking with WooCommerce
This post outlines some of the many benefits of order tracking with WooCommerce. The concept is simple but it can have a major impact on your business. Boost your efficiency, meet customer expectations, and establish your brand as a reliable place to shop by optimzing the delivery and tracking experience for your buyers.