
Today’s ecommerce market has significantly expanded the customer base available to sellers. Businesses can now reach shoppers around the world almost as easily as those just down the road. In this post, we will look at how you can set up WooCommerce for international orders to grow your audience.
What is needed for an international ecommerce store?
International shipping
The first thought that comes to mind when selling internationally is how you will deliver your products. You not only need to get your goods to other countries but you also need to ensure everything arrives in good condition.
Major carriers UPS, FedEx, DHL, and even USPS make it so you can send your goods around the globe without much more effort than a domestic order. However, you need to factor in the cost. International delivery fees can vary wildly depending on the customer’s location and your chosen carrier.
That said, you don’t want to confuse your international customers with shipping fees. You will have to weigh whether using flat-rate shipping works for your business. This might mean lower margins but could lead to better conversions, as customers can see the shipping cost prior to moving through the checkout process.
Support for multiple currencies and payment methods
International ecommerce stores need to offer multiple payment methods. Shoppers in different countries each have their preferred method of payment. For many, this will be traditional debit and credit cards. Others will prefer more modern payment methods. For example in China, it is common for consumers to use mobile payment apps such as WeChat.
To cater to as many people as possible, you should configure your store to accept a variety of payment methods.
In addition to payment options, stores need to present multiple currencies. Shoppers are accustomed to seeing items’ prices in their local currency. If an item is listed in another currency, they will have to make the effort to calculate what the value is in their common currency. Small steps like this can lead to friction in the buying process and may lead to visitors choosing to shop somewhere else.
Support for VAT and other taxes
Certain locations will incur additional taxes. For example, when selling to customers in Europe and other eastern nations, you need to collect the value-added tax (VAT). If you currently only sell in the US, this is something new you’ll need to plan for.
In addition to collecting the tax, some locations have specific laws regarding how you must disclose these taxes on your site. This means that you will need to review your privacy and policy pages to ensure that they have all the required information. If they do not, you will need to create a location specif version to ensure that you adhere to all local regulations.
Accounting for size differences
If you sell products that come in different sizes, you need to account for different measurement systems in other locations. For example, a women’s size 6 shoe in the United States is a size 4 in the UK.
You may be familiar with the differences but that does not mean the same is true for your international customers.
Therefore, it is essential to remove any uncertainty regarding your products by making the sizes as clear as possible. Properly converting your sizes will ensure that customers buy the appropriate items, saving you from avoidable returns in complaints.
Aligning the customer experience
While shoppers across the world share some interests, not everyone will have the same preference when comes to how you design your website and user interface. You want to check your imagery and copy to ensure that they are culturally relevant to your various audience. Otherwise, your website will not resonate with your visitors and they will leave your site without completing a purchase.
Setting up WooCommerce for international consumers
Configure shipping for global locations
The first step to setting up WooCommerce as an international store is to make sure customers can select a global delivery location when placing their orders.
Go to WooCommerce > Settings > General. In the General options section, find the fields for Selling locations and Shipping locations. Make sure that these fields include your desired locations. If you want to sell and ship everywhere, they should read Sell to all countries and Ship to all countries you sell to respectively.

Next, you need to set up shipping zones. If you have been shipping products exclusively to domestic locations, you likely haven’t created a shipping zone for international deliveries when setting up your store.
To create an international shipping zone go to WooCommerce > Settings > Shipping. Depending on your intended markets you may only need one zone for all international locations or you may benefit from creating several zones. Either way, select Add shipping zone.

Enter the Zone name and select the Zone regions. These can be countries or entire continents.
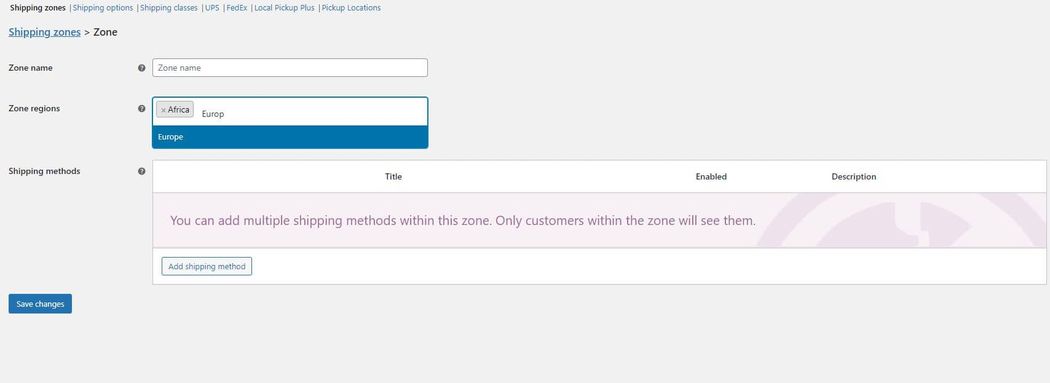
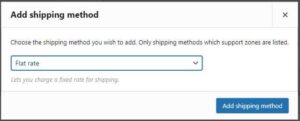
After you pick the locations, select Add shipping method. You can then add the various carriers eligible to ship deliveries in this zone.
Currency Switcher for WooCommerce
The Currency Switcher for WooCommerce extension allows shoppers to adjust the currency on your site while shopping. As you set up WooCommerce for international orders, you can pick a list of available currencies. Shoppers will then be able to use the switching widget to adjust the currency on the Cart, Checkout, and Shop pages.
The switcher can also contain a menu that shows the exchange rate for currency pairs.
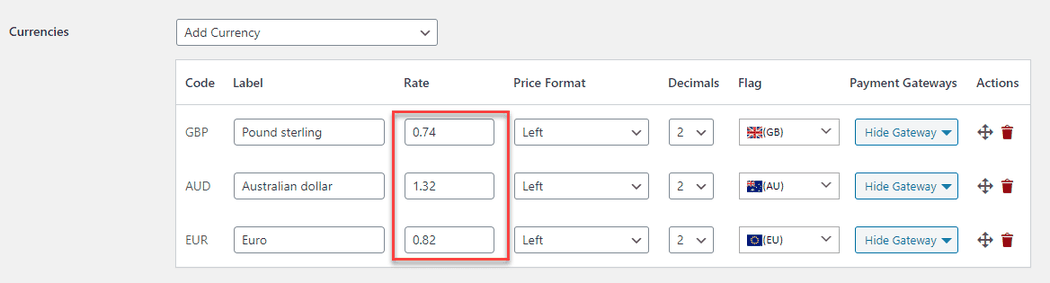
After you download the extension, go to Woocommerce > WCCS Settings to begin configuring your multicurrency setup. Click Add Currency to add a new type of money to the list. When you add a currency, you will need to set the decimal denomination and the display flag. You also need to set an exchange rate.
This rate is in exchange for a value of “1” for the default currency. For example, if you set a rate of 1.50 for the Australian Dollar and your default currency is the US Dollar, a $10 product will cost $15 Australian Dollars.
The plugin also has the ability to automatically fetch live exchange rates via API.
Set default currency by location
Currency Switcher lets you set the default currency based on the user’s location. By doing so, you can streamline the shopping experience for your buyers so that they automatically see the price that is most relevant to them. The plugin uses the visitor’s IP address to determine the appropriate currency to use as a default.
Check Show currency by location to enable this option.

When you enable Currency by Location a new option named Location API Access Key appears. You will need to provide the API key for the location-based default to work.
To access the key, click Get API Key. This will take you to the ipapi dashboard where you can configure the API. Once you complete the setup, you’ll receive the API Access Key. Copy the key and paste it into the corresponding field on the settings page.
Note, that you will need to add the national currency for each location if you want the switcher to work for a specific area. If you do not include a location’s currency on your currency list, your site’s default currency will be used.
Rate Storage
The Rate Storage Section lets you determine how the extension stores the exchange rates used for your various currencies. There are two options: Transient and Session time.

With Session time, the rates are not cached. As such, the extension will fetch them from the browser during each session. Transient time, on the other hand, will cache the rates for 24 hours before fetching rates.
Translate your website with WooCommerce Multilingual
Once you enable multiple currency support, the next step in taking WooCommerce international is to create translations for your web content. This will ensure that everyone, no matter their location, is able to read and understand your messaging.
WooCommerce Multilingual is a powerful solution for translating your store into any language needed. There are multiple components of the extension. WooCommerce Multilingual comes with an installer that downloads and updates each of the required plugins.
Once you add the extension to your site, go to the WooCommerce Multilingual settings page to enter your registration key or purchase a license. You’ll then need to go about translating the content across your site. There are several ways to do this. We will examine these below.
Translating products automatically
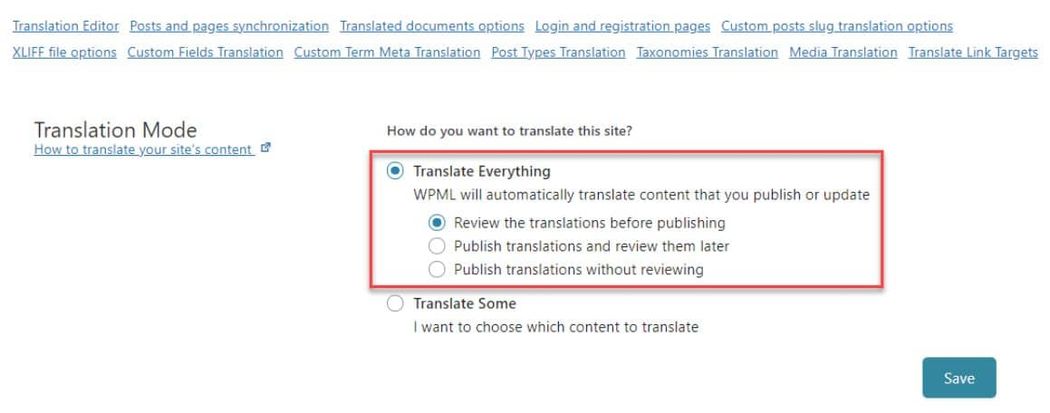
The first approach you can take for translating your WooCommerce content is to automatically translate the entire site with the Translate Everything mode. This will cover all your products, categories and pages. New creations will automatically be updated as well.
Go to WPML > Settings and select Translate. You will have the option to review the translations before it processes or you can initiate the translations without reviewing them. For the sake of time, starting the process without reviewing is your best option
If the process is successful, you will see the following message.

Keep in mind, that any custom fields or post types will not be automatically translated.
Cart and checkout pages
Translating the WooCommerce international checkout and cart pages may require additional steps. Some WordPress themes use localization files to provide their own translations. If your theme has MO and PO (localization) files that match your website’s languages, you can scan your theme to load the files.
Once the scan is complete, the pages should be translated on your front end.
To scan for the strings go to WPML > Theme and Plugins Localization. Select the theme and initiate the scan. If the translation doesn’t process, your theme may be missing the localization files. In this situation, you can check your wp-content/languages/plugins/ folder to check for MO and PO files in a secondary language.
If you do not find the files, go to WPML > Languages and select Add/Remove languages. You do not need to specify any language. Clicking Save should automatically trigger the download of the localization files. Return to your wp-content/languages/plugins/ folder to check for the files.
Translating products yourself
The other approach to translating your content is to manually translate each asset yourself. Go to the WooCommerce Multilingual settings page to find a list of the products, categories, tags and attributes that you can translate.
The listings will include a separate version for each language. There are translation status icons for every listing allowing you to see what products are yet to be translated for each of your languages.
To add a new translation, click the Plus icon. This will open the advanced translation editor where you can run and review the translation before finalizing it.
Translating variable products
WooCommerce Multilingual will automatically create product variations for each language that has an active translation. The same applies to variations added for new products. After you create a variation in your default language, the extension will immediately create variations for all product translations.
If you take the manual approach, you can translate variations from the Product tab. This includes the option to translate the variation image titles. When you translate the variation, you also have the ability to translate any of your product attributes. If the variations include global product attributes, you need to translate them in the taxonomy tabs.
Translating components
WooCommerce Multilingual gives you the option to translate your URLs. This will ensure congruence between your URLs and on-page text. It will also make it easier for people in different locations to navigate your site.
From the WooCommerce Multilingual page, click the Store URLs tab. There you will see a full list of URLs and their current translation status for each language. Clicking the Pen icon lets you edit an existing translation. Selecting the Plus icon will add a new translation.
The following URLs are available to translate
- Product permalink base
- Product category base
- Product tag base
- Product attribute base
- Product attribute slugs
Final thoughts on setting up WooCommerce for international orders
If your business only sells to local customers, expanding your reach into new geographic areas can prove an effective way to grow your sales and audience. Start by making a plan for shipping your goods internationally and then configure your WooCommerce store to appeal to a new group of buyers.